Squarespace Announcement Bar: How to Add, Style, & More
Do you have big news to share, like a sale, event, or exciting update? The Squarespace announcement bar is an easy and effective way to grab visitors’ attention the moment they land on your site.
In this guide, we’ll talk about using a Squarespace announcement bar to enhance your site. Whether you’re sharing updates, recommending products, driving engagement with quizzes, or promoting special offers, this feature is a powerful way to connect with your visitors.
Let’s start with some creative ways to use your announcement bar. If you’re ready to dive straight into the setup, skip ahead to learn how to add an announcement bar and how to customize an announcement bar.
How to Use the Squarespace Announcement Bar
The announcement bar is a powerful tool for connecting with your audience and driving them to take action. Here are a few ways how you can use it strategically:
Promote Interactive Content
- Surveys: Are you curious about what people think of your latest product or service? Simply place a Squarespace survey on the bar to gather in-depth feedback.
- Polls: Squarespace polls are great for quick decisions, such as deciding on the name of a new product. Unlike surveys, polls focus on a single question.
- Quizzes: Squarespace quizzes are great for generating leads by engaging users in a fun way. They keep visitors entertained while helping them find their perfect match, increasing the chance they’ll share their contact information.
- Forms: Squarespace forms are perfect for capturing and organizing information, such as newsletter sign-ups, contact details, or inquiries.
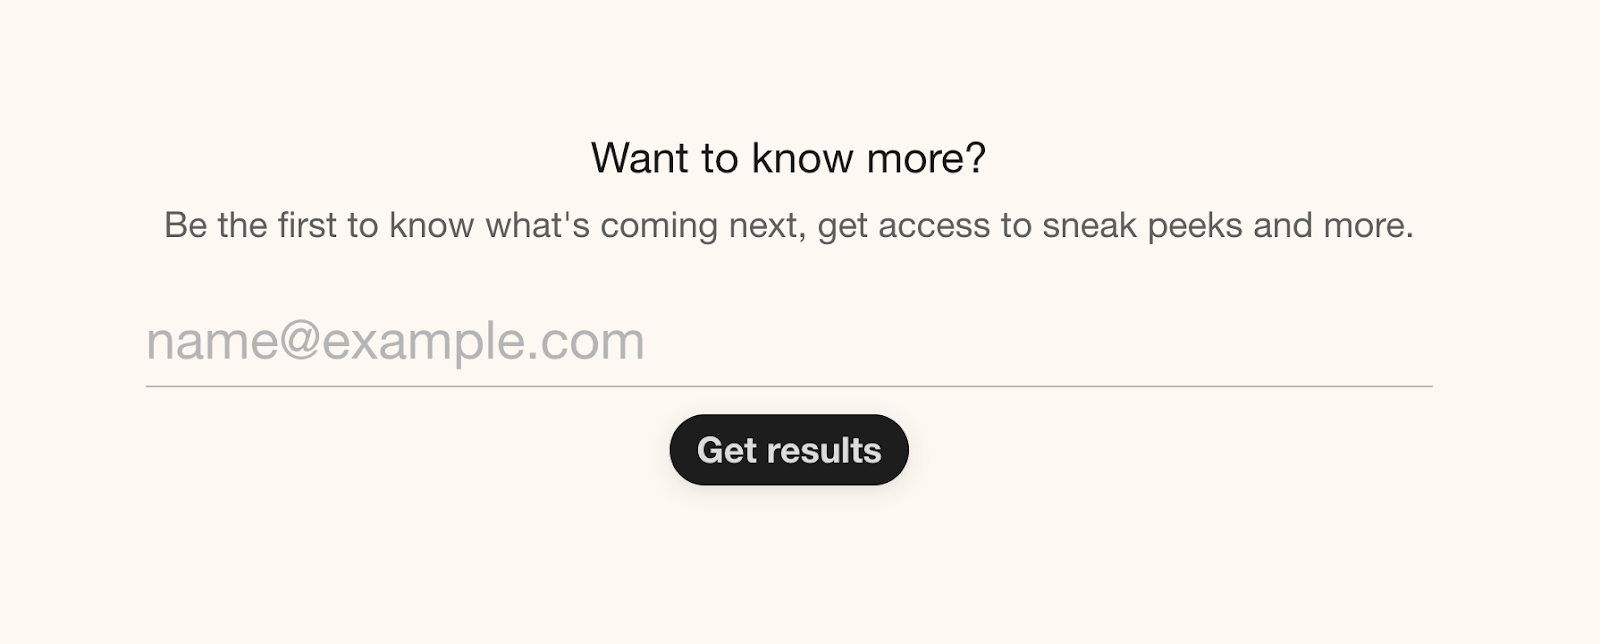
Take e-bike brand Cowboy, for example – they use their announcement bar to direct visitors to a quiz designed to help them choose the ideal bike…
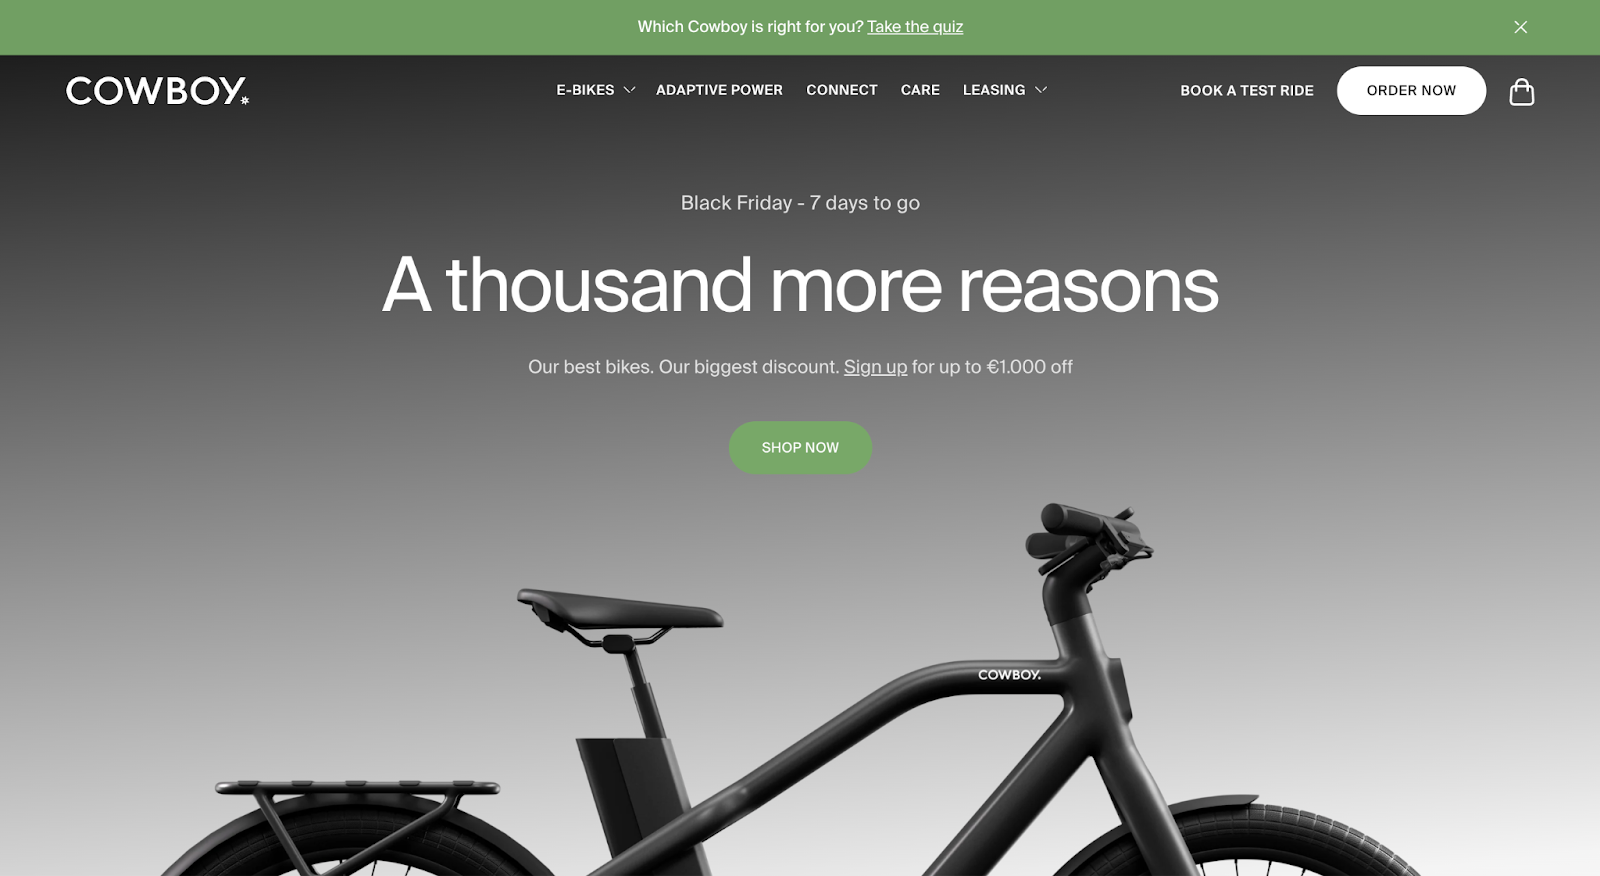
… and make a smart move by asking for the participant’s email before sharing their result.
Highlight Key Updates & Events
- Event notifications: Hosting a webinar or special event? With a Squarespace announcement bar, you’ll make sure no one misses it.
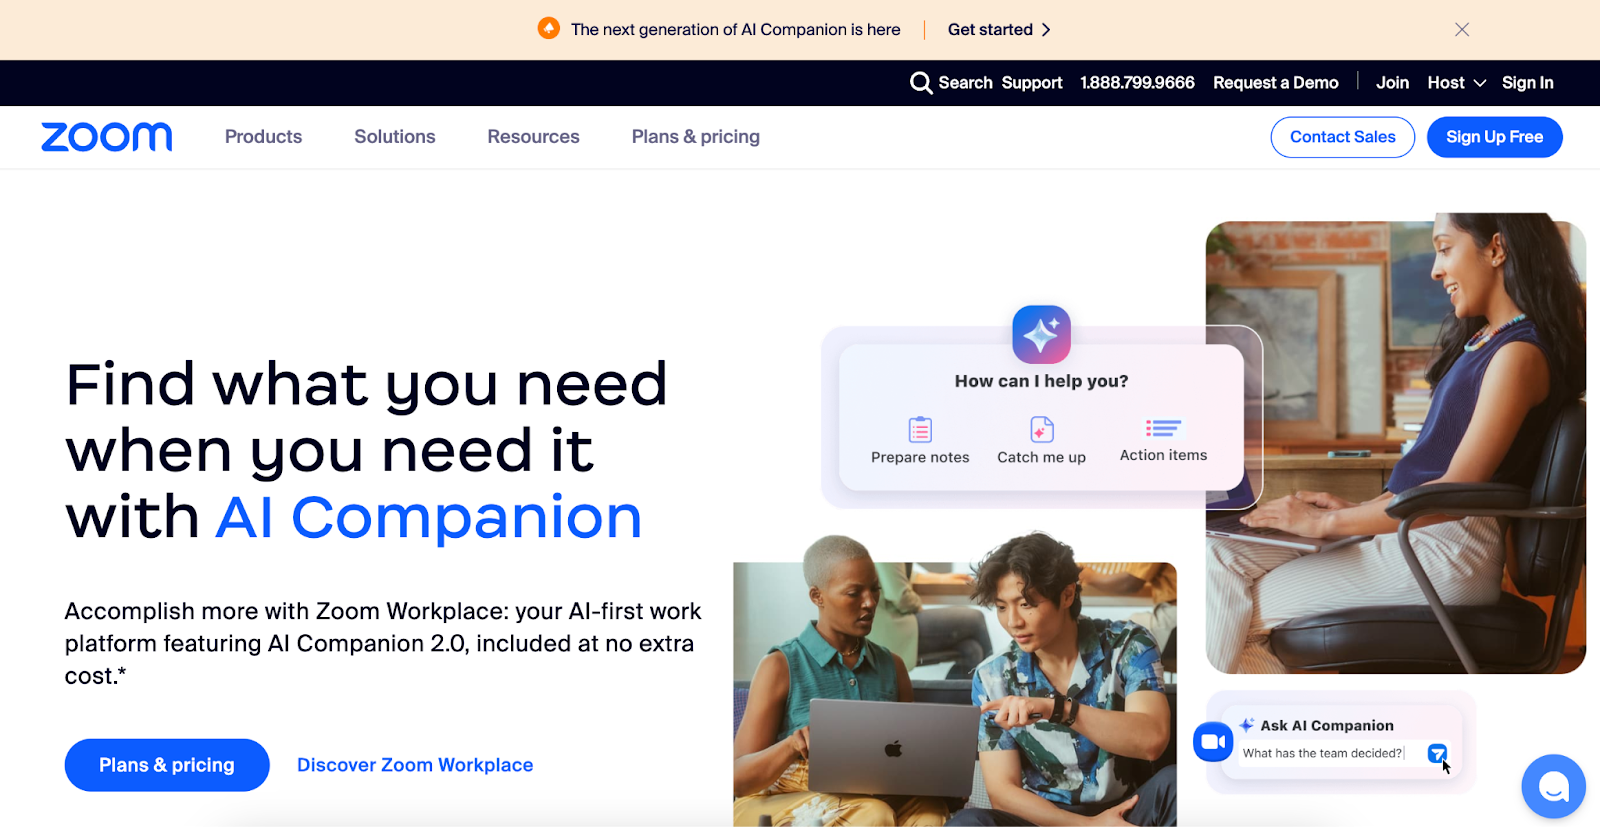
- New product/feature announcement: If you’ve launched a new product or feature, share the news with your visitors. You can direct them to learn more, just like Zoom did with its AI Companion feature.
Boost Sales & Marketing Campaigns
- Promotions & discounts: You can drive conversions by sharing promo codes, exclusive offers, or seasonal sales like Black Friday.
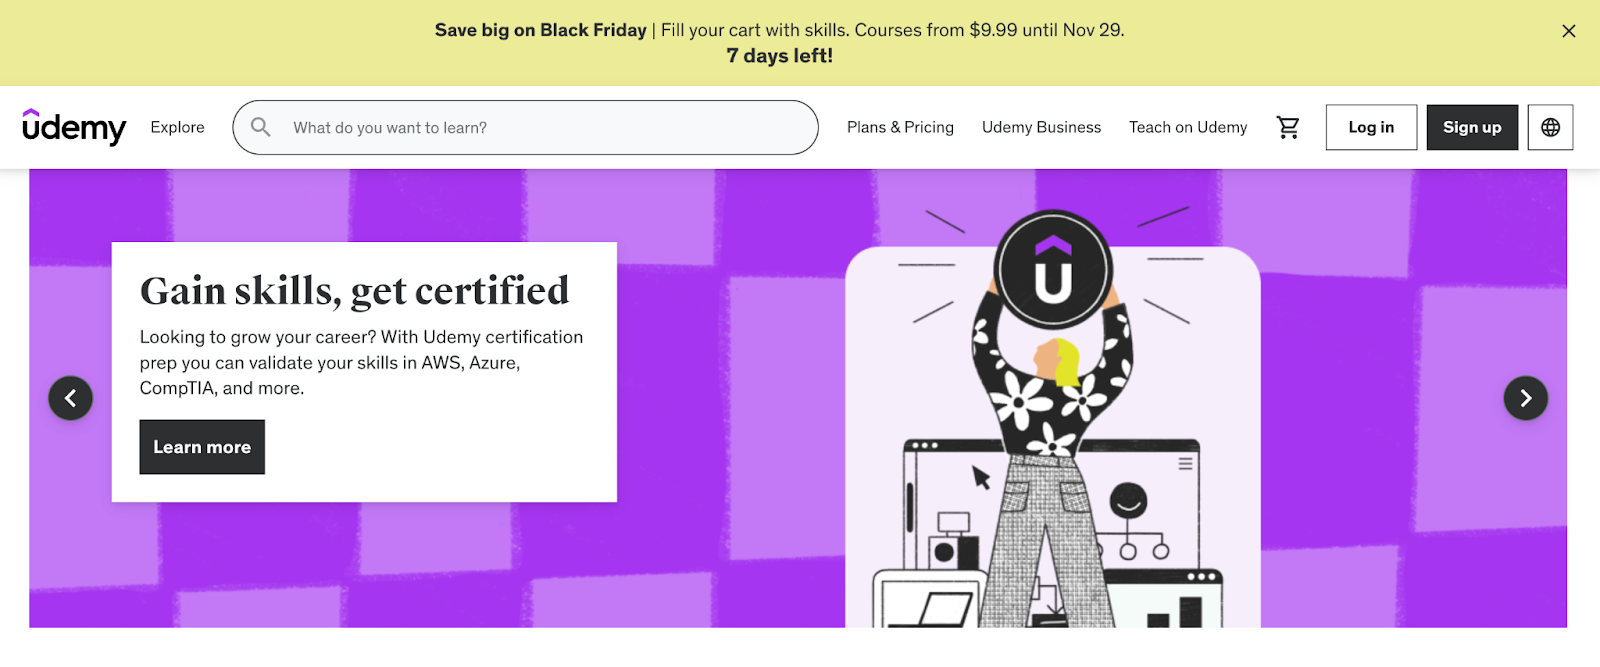
- Countdown timer: Create urgency by highlighting limited-time offers with a countdown timer in the bar. Alternatively, you can set a specific end date, like Udemy did. This encourages visitors to act quickly.
Share Useful Information
- Policy updates & disclaimers: Keep customers informed about important site updates or return policies.
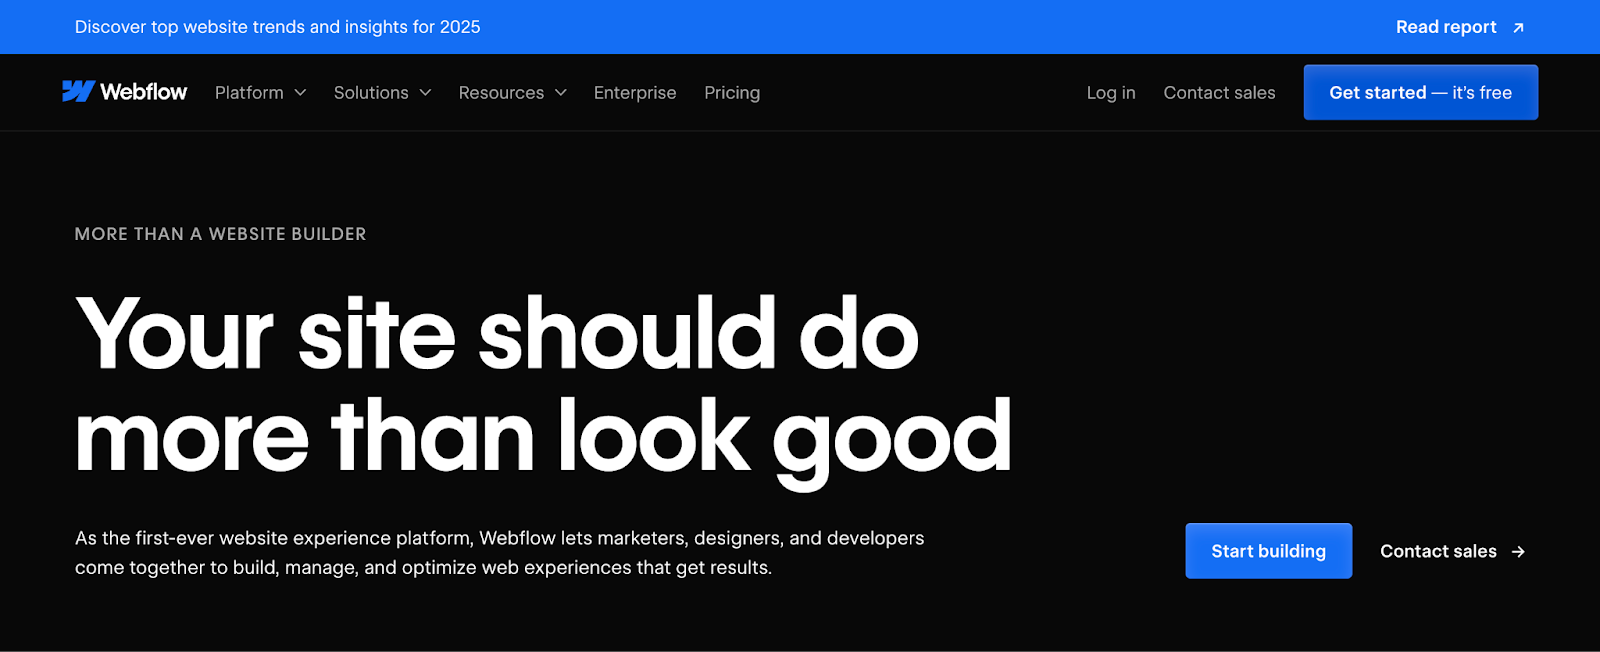
- White papers: Share valuable resources like white papers or industry reports. As an example, Webflow promotes a 2025 industry forecast like this.
How to Add or Remove an Announcement Bar on Squarespace
Adding a Squarespace announcement bar is super easy. No tech expertise is needed—just follow the simple steps below.
Note: The Squarespace announcement bar is only available for Business or Commerce plans.
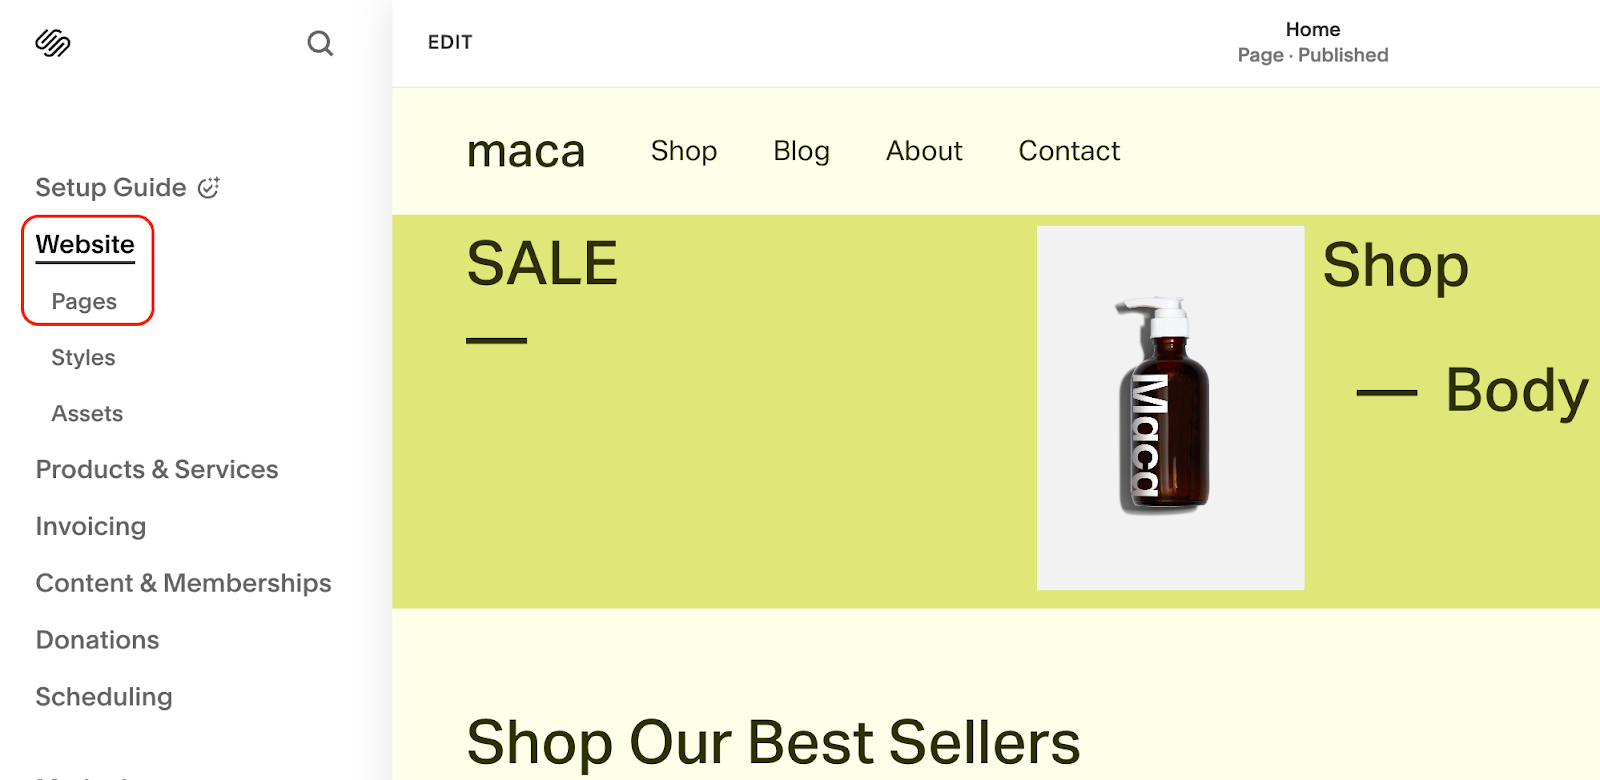
1. From the menu on the left-hand side, click Pages in the Website section.
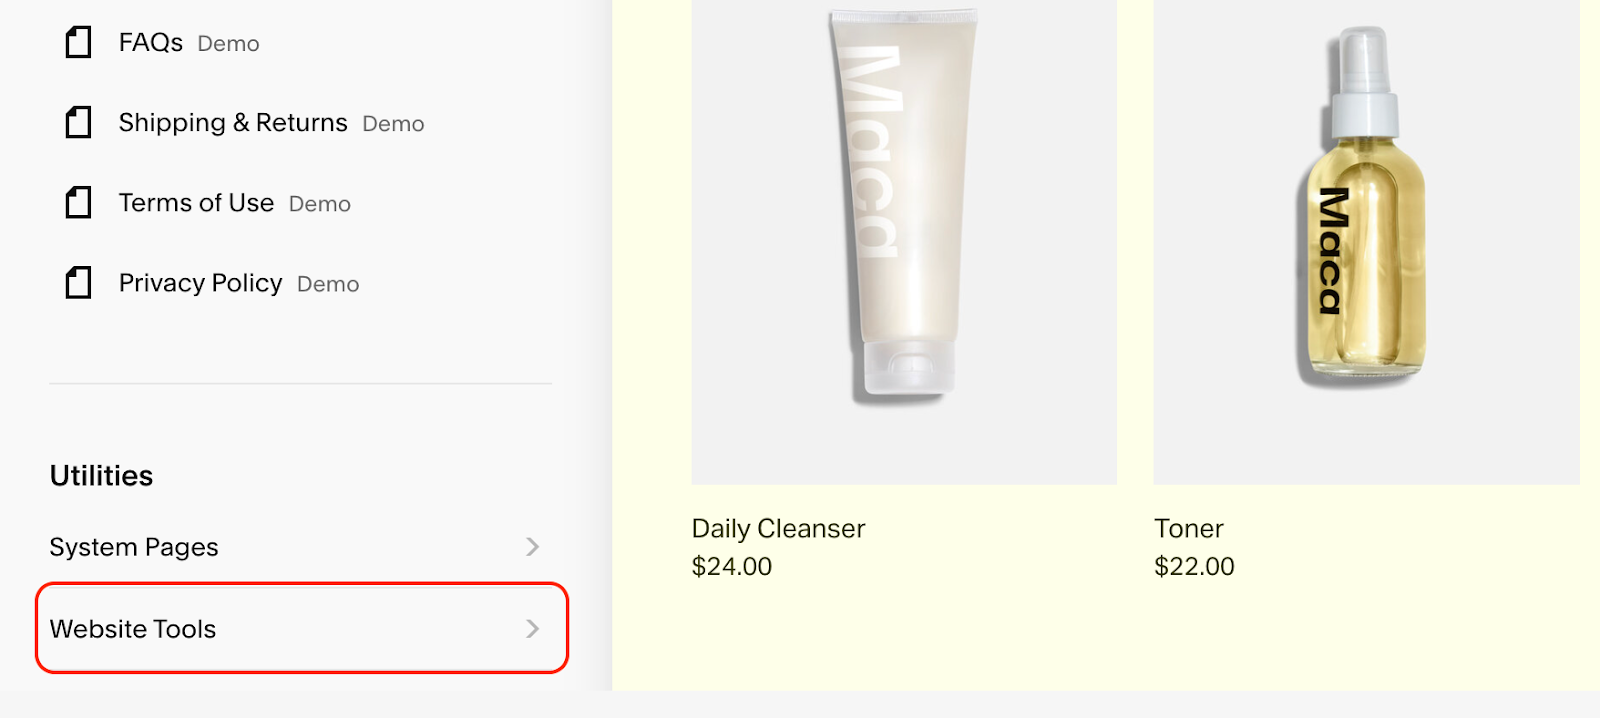
2. Scroll down to the Utilities section and select Website Tools.
3. Next, select Announcement Bar from the options to open the settings window.
Toggle the Enable Announcement Bar option, and your announcement bar will show up at the top of your site.
Note: If you no longer need the bar, simply toggle the Disable Announcement Bar option, and it will be removed from your site.
Type the message you want to display in the text window. If you include a link, the entire bar will become clickable.
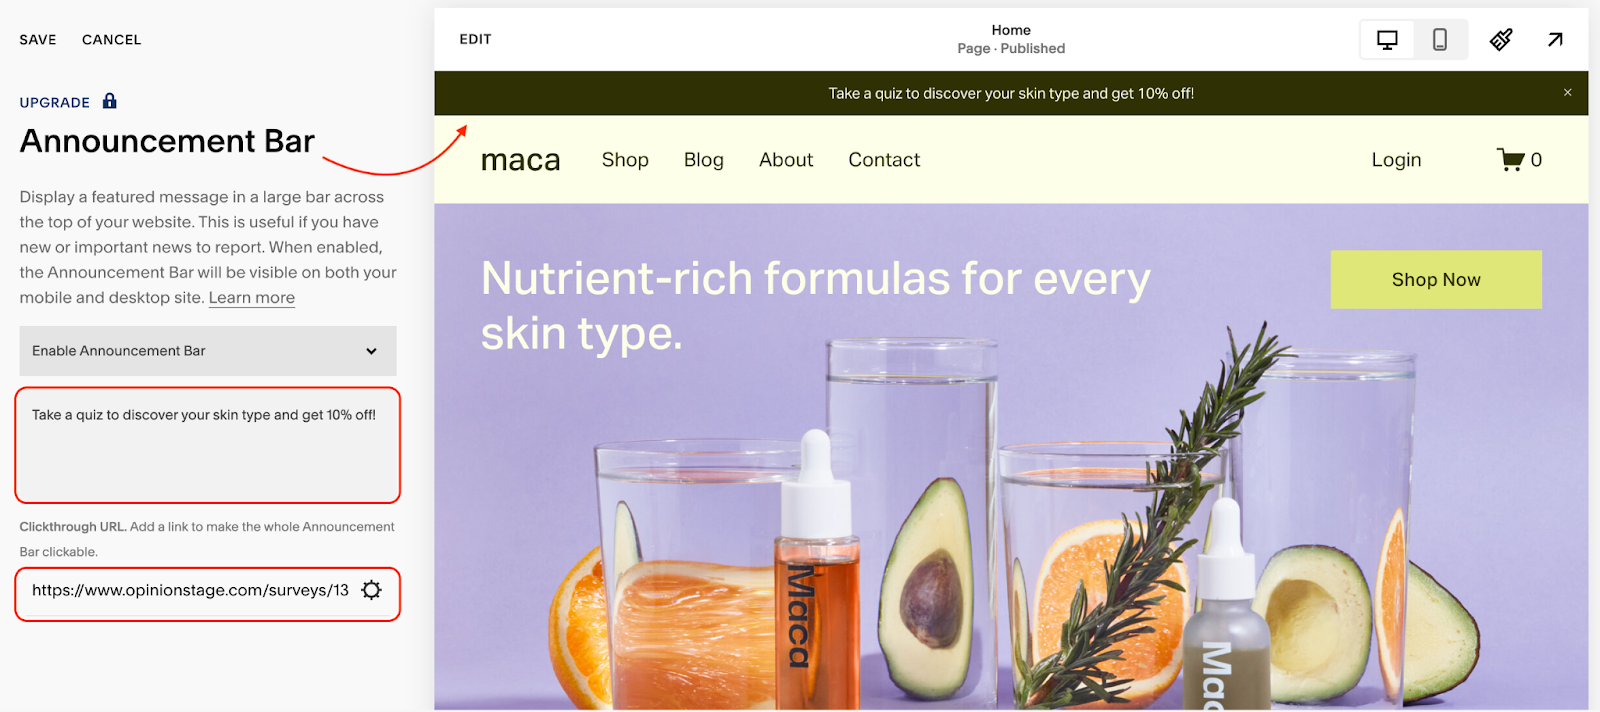
If you’re happy with it, click Save to apply the changes.
That’s it! Your announcement bar on Squarespace is now live and ready to grab attention.
How to Restore a Closed Announcement Bar
If your website visitors have closed the announcement bar and you want it to reappear for everyone, you can easily restore it. Here’s how to make it happen:
- Navigate to the Announcement Bar settings and make a minor edit (for example, change the text or update the link).
- After making the edit, save your changes. This will reset the bar and make it reappear for all users who previously closed it.
It’s a simple fix that ensures important messages are always visible to your audience.
How to Customize Your Squarespace Announcement Bar
Now that you’ve set up your announcement bar in Squarespace, it’s time to make it pop. In this section, we’ll share tips and creative ideas on how to edit the announcement bar so it perfectly suits your style and needs.
If you’re also looking to customize other elements of your site, such as the navigation bar, check out our guide on how to edit the navigation bar in Squarespace.
The Site Styles editor allows you to make changes to your announcement bar quickly and easily. To access Site Styles, simply open your website in editing mode. Once you’re there, click on the paintbrush icon in the upper right corner.
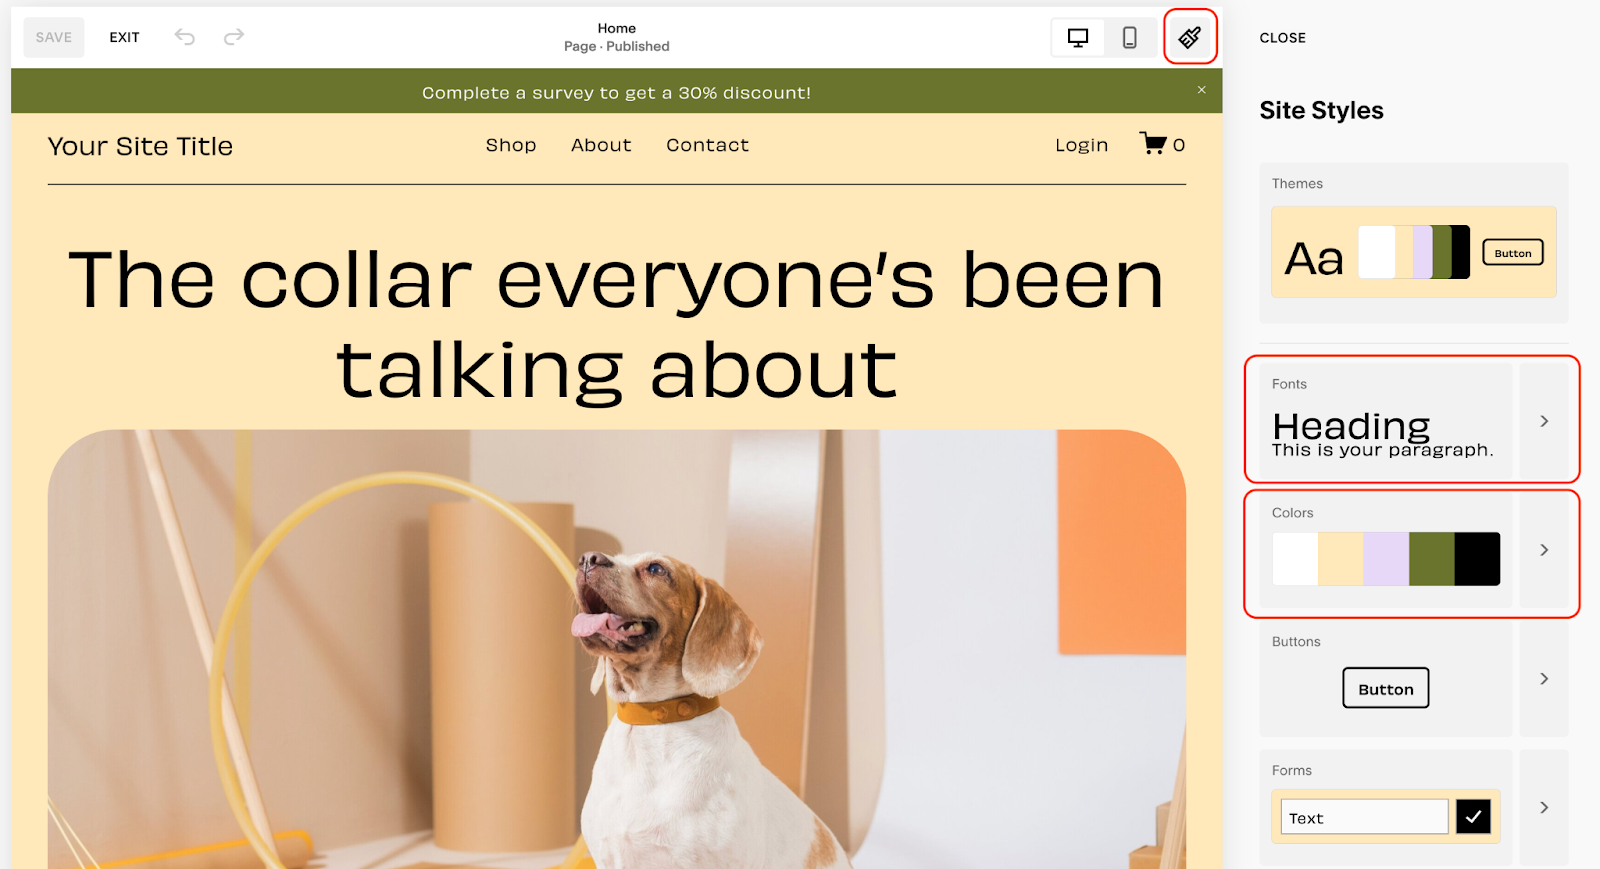
This will open a sidebar with the style settings. Here you can customize various elements of your site, including fonts and colors.
Change the Font
Changing the font of your announcement bar can help it align with your brand’s style. Here’s how to do it:
1. In the Site Styles section, click Fonts > Assign styles.
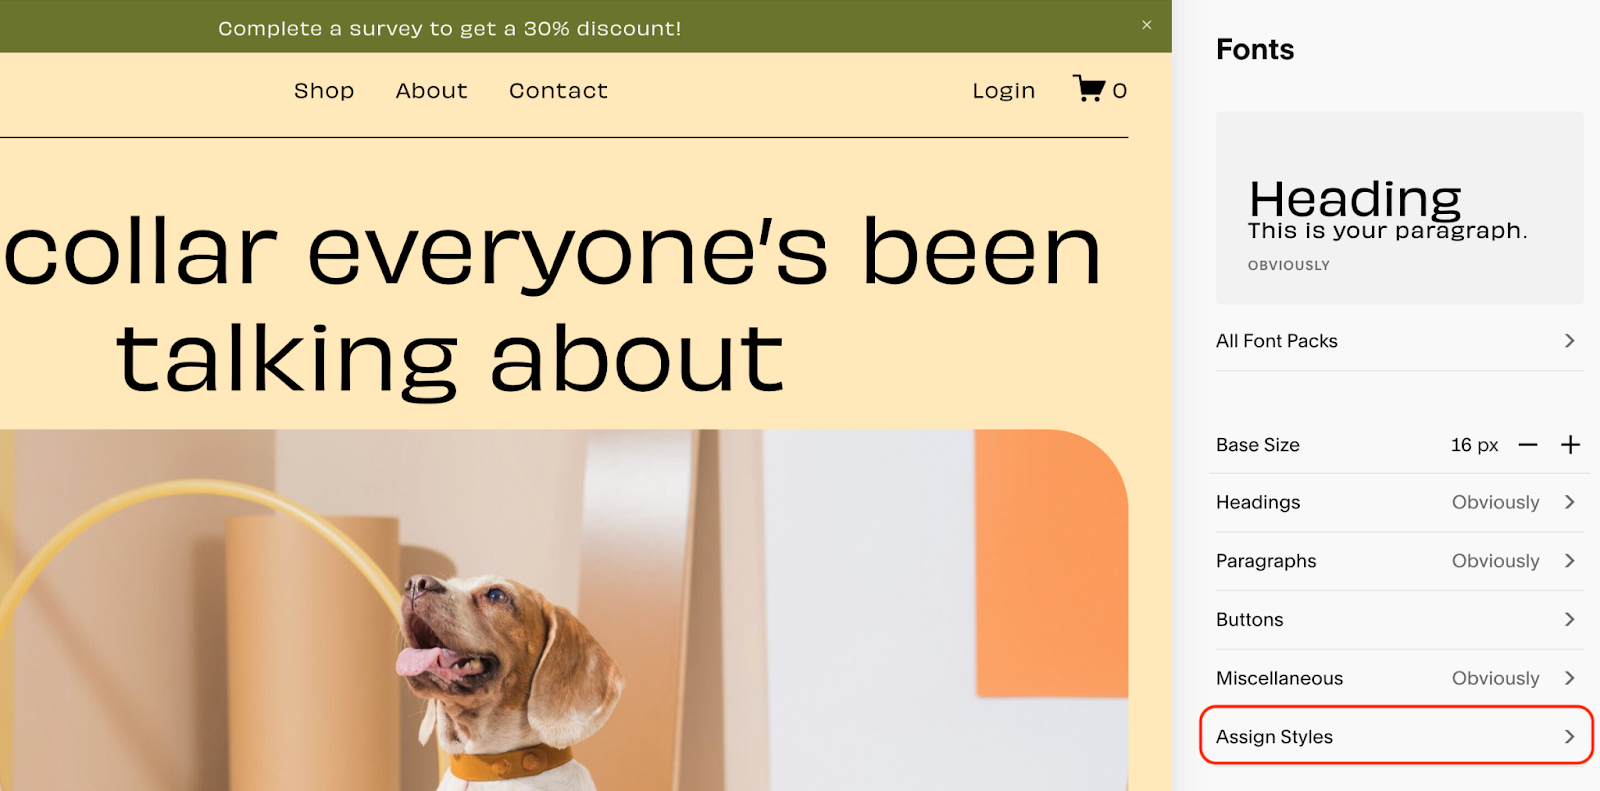
2. From there, scroll down to the Announcement Bar section.
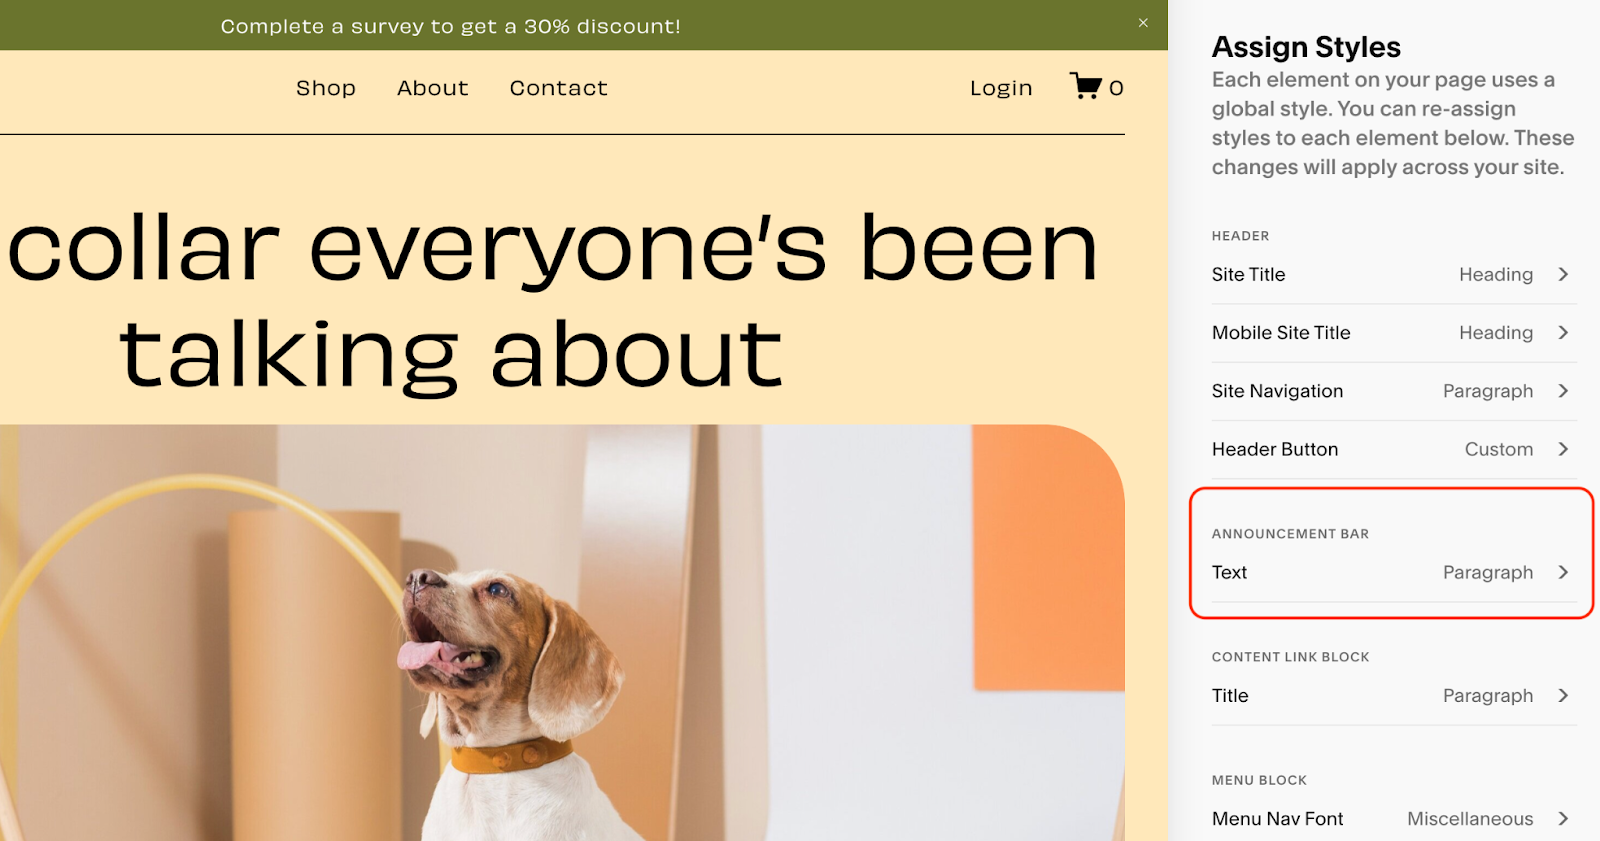
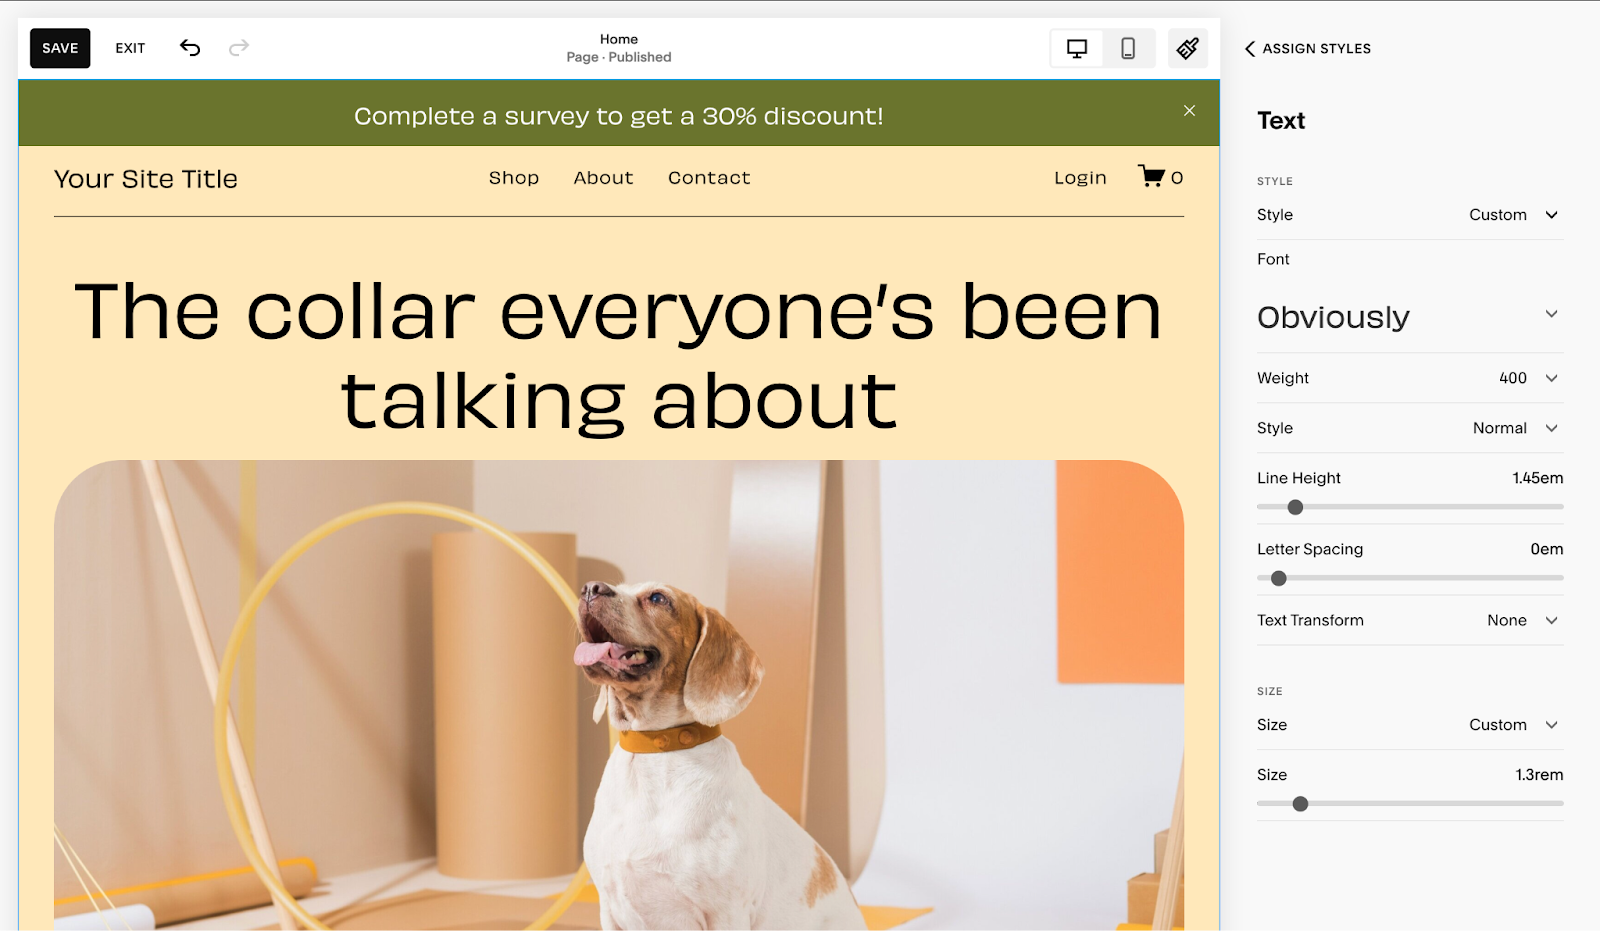
3. Browse through the available fonts and settings to tweak your message on the announcement bar. Once done, click Save to apply the changes.
Change the Color
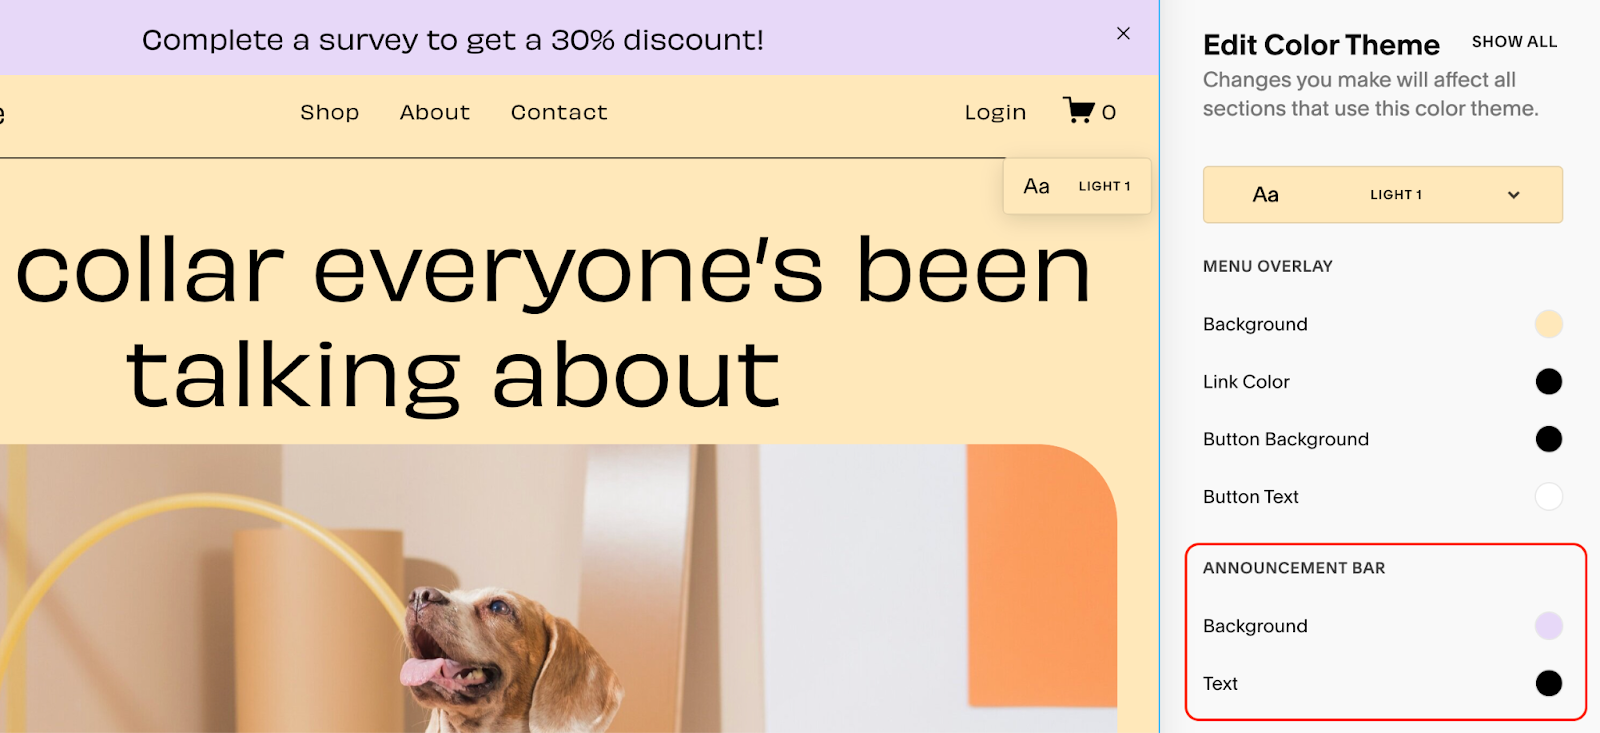
To make your bar stand out, you can change its color. Here’s how to change the color of the announcement bar on Squarespace:
1. In the Site Styles section, click the Colors settings.
2. Next, click the pencil icon next to a color theme.
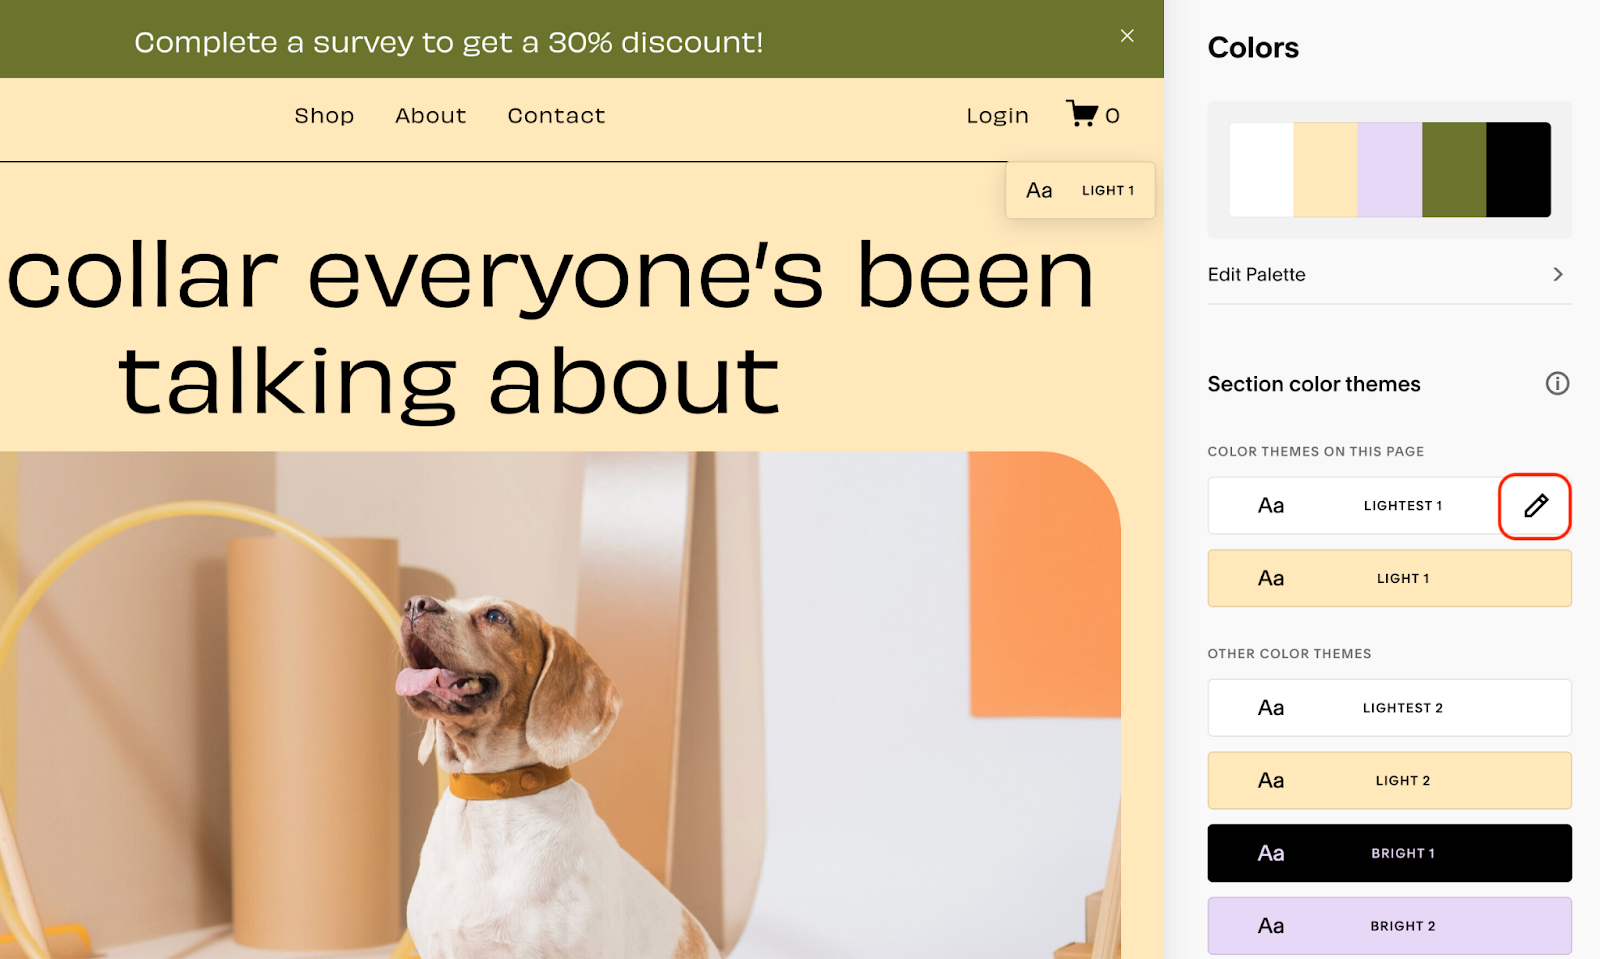
3. In the Announcement Bar section, you can choose from the default colors or enter a custom hex code for an exact color match. After selecting your colors, click Save to apply the changes.
Add an Interactive Element
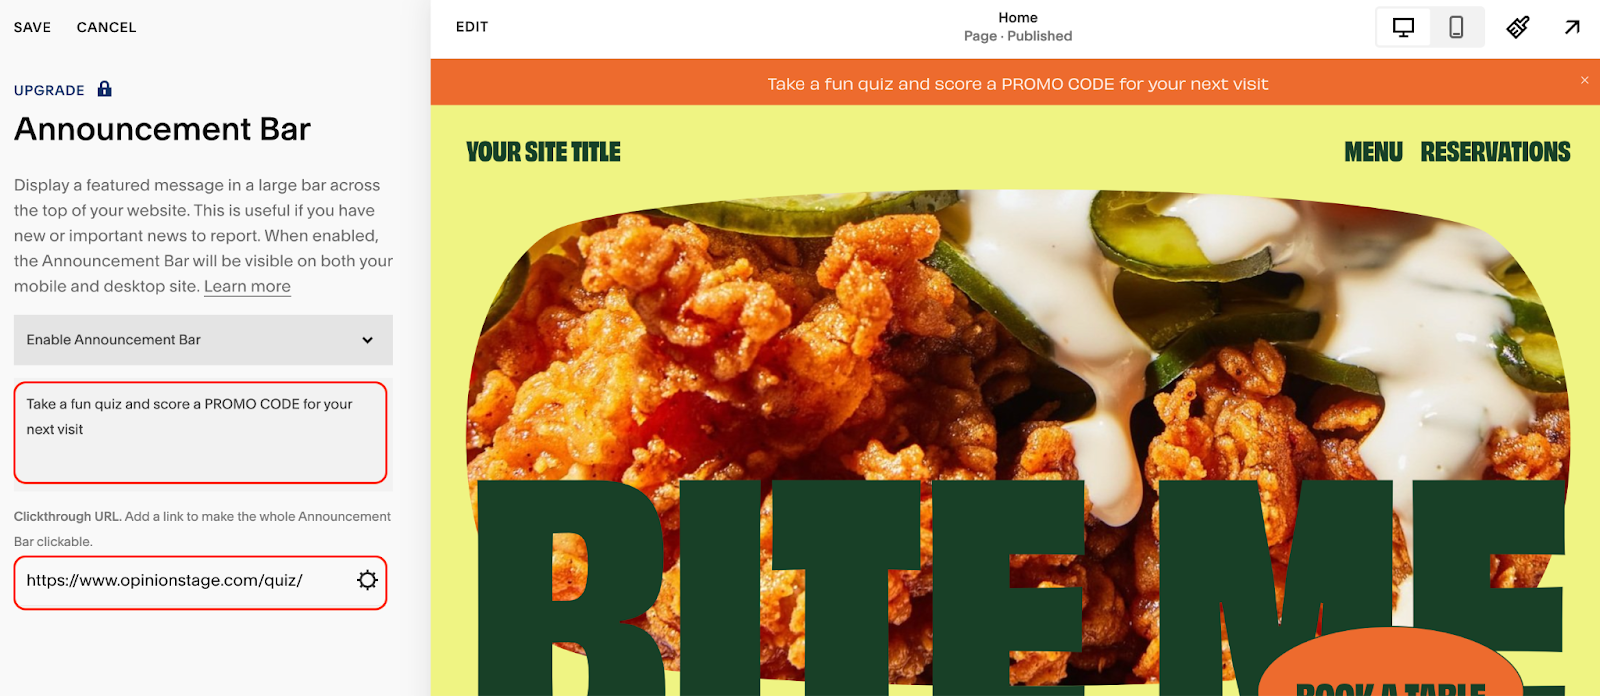
Quizzes are effective tools for boosting sales by engaging visitors and directing them to specific pages on your website. For example, if you own a food delivery service, you can guide users to different meal options based on their quiz results. By offering these personalized recommendations, you can encourage more conversions. Consider adding a small incentive for completing the quiz, such as a discount code or entry into a giveaway. This can further boost participation and sales.
Simply write a compelling message that encourages visitors to take the quiz and add a link in the Announcement Bar settings. For a detailed guide, check out our tutorial.
How to Customize Your Announcement Bar with CSS
In some cases, you may want to completely customize the announcement bar. Luckily, Squarespace offers the option for you to add Custom CSS, which allows you to achieve a cohesive, on-brand look.
On the left-hand panel, find the Utilities section and click Website Tools > Custom CSS.
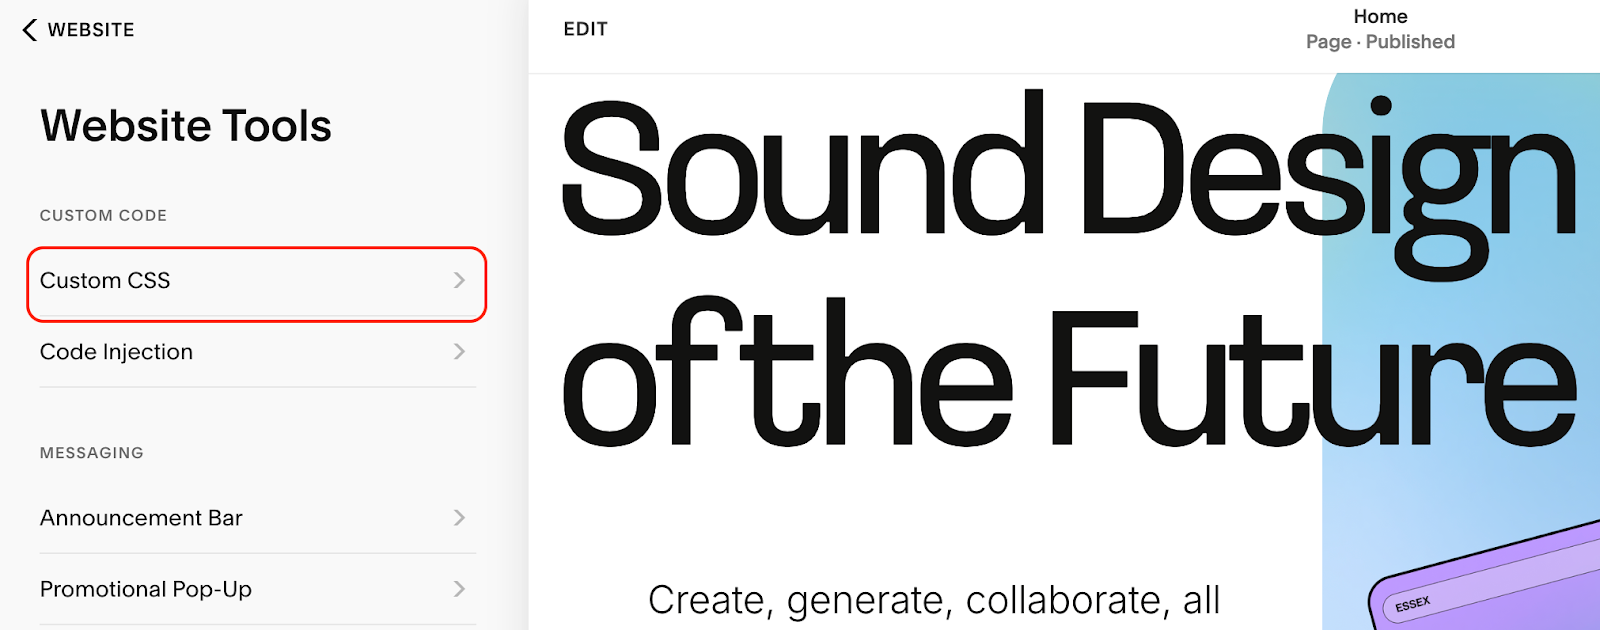
This is where you can add your custom CSS.
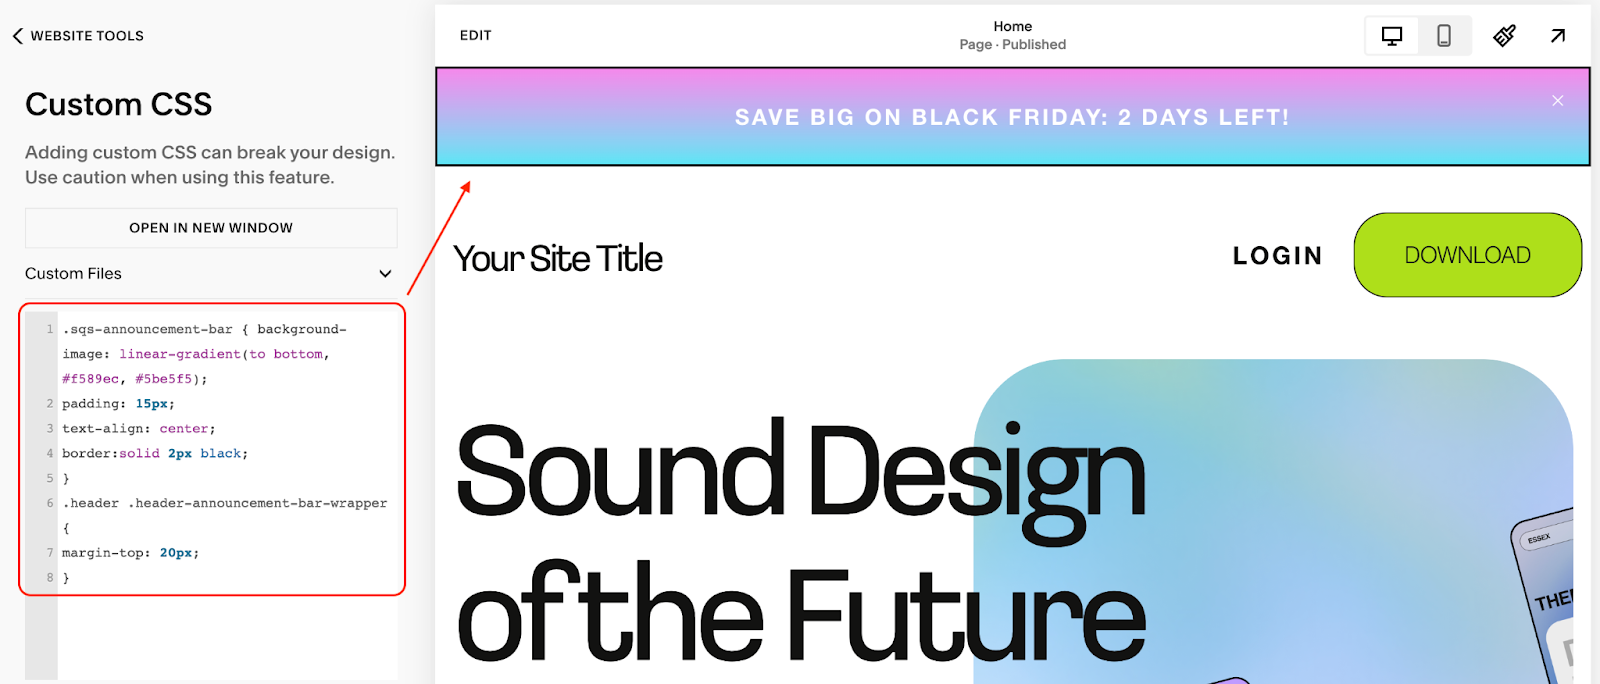
Customizing your Squarespace announcement bar with CSS is a great way to make it fit your website’s unique style. Like in the example above, you can tweak the background color, adjust the text alignment, or even add borders to frame the bar.
If you’re not familiar with writing CSS from scratch, you can ask ChatGPT to help you generate the code. Just keep in mind that it’s always a good idea to test the code to ensure it works exactly as you want.
Make the Announcement Bar Always Visible
The announcement bar ensures that important updates are not overlooked. But what if a user manually removes it? No worries—there are simple tricks to keep it always visible.
One option is to use custom CSS to remove the “X” button from the bar so it can’t be closed. Just paste this code in the Custom CSS box:
.sqs-announcement-bar-close {
display: none!important;
}
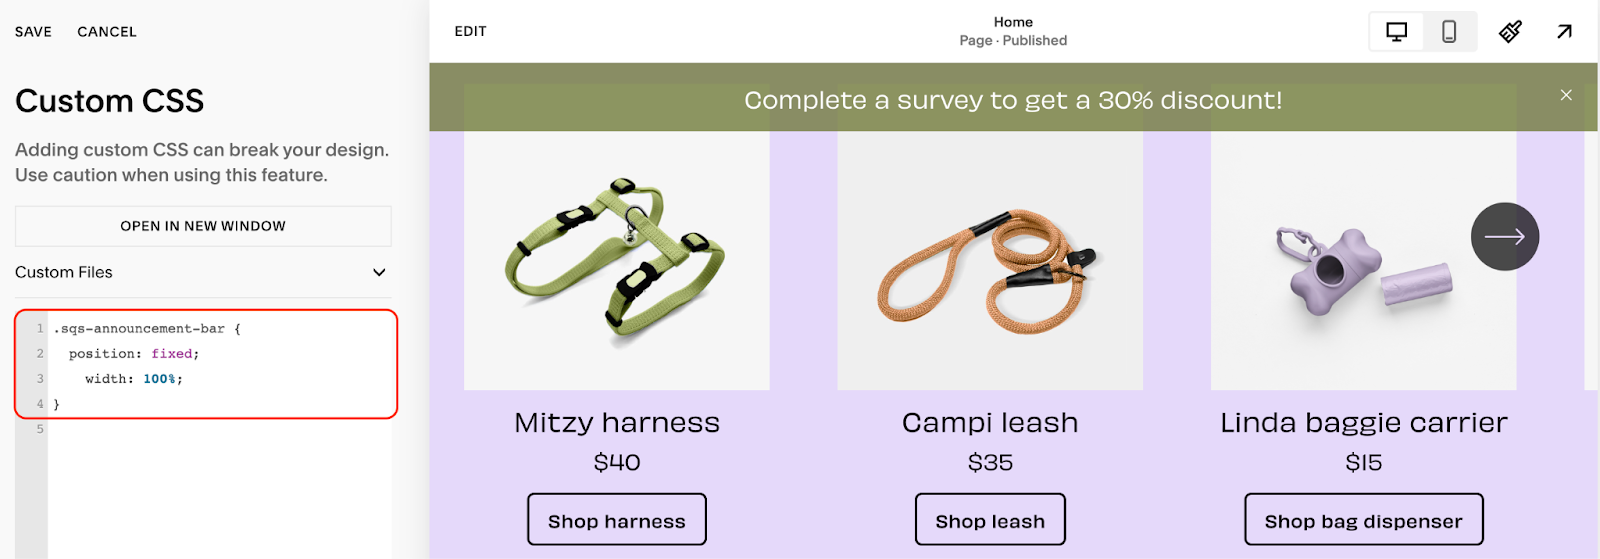
Another approach is to make the announcement bar fixed on the page. This way, it remains visible as users scroll. To achieve this, use the following custom CSS code:
.sqs-announcement-bar {
position: fixed;
width: 100%;
}
Display the Announcement Bar on Only One Page
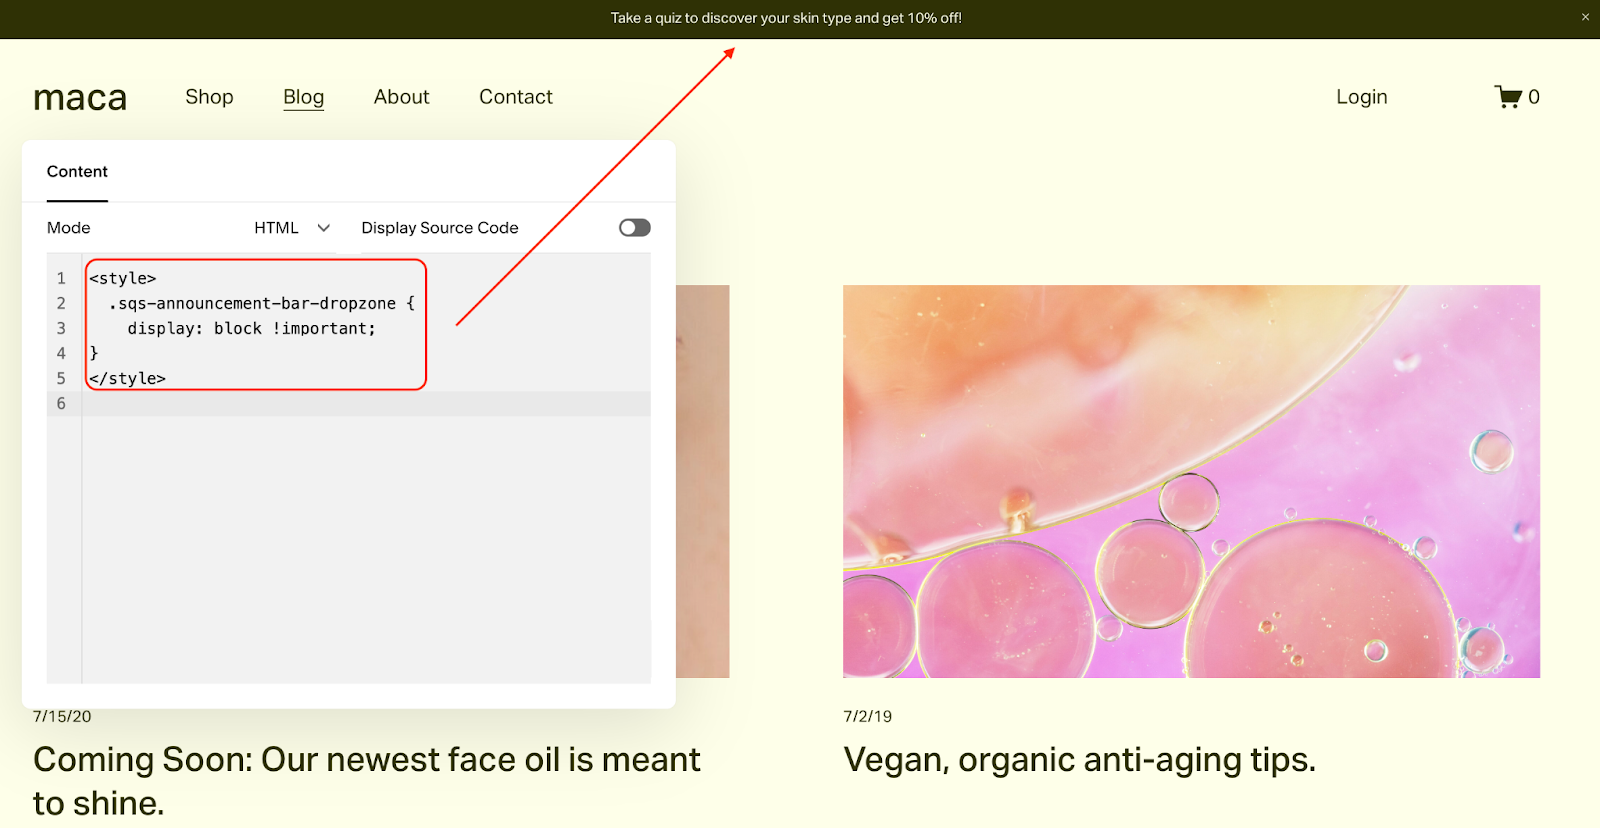
Sometimes, you don’t need your announcement bar displayed site-wide. Perhaps you want it to appear only on a specific Squarespace landing page. With a bit of customization, you can make the announcement bar show up exactly where you want it.
Add the following code to the Custom CSS section:
.sqs-announcement-bar-dropzone {
display: none;
}
Next, open the page in editing mode where you want the announcement bar to be displayed. Click Add Block > Code and add the following code:
<style>
.sqs-announcement-bar-dropzone {
display: block !important;
}
</style>
Add the Announcement Bar to the Bottom of a Page
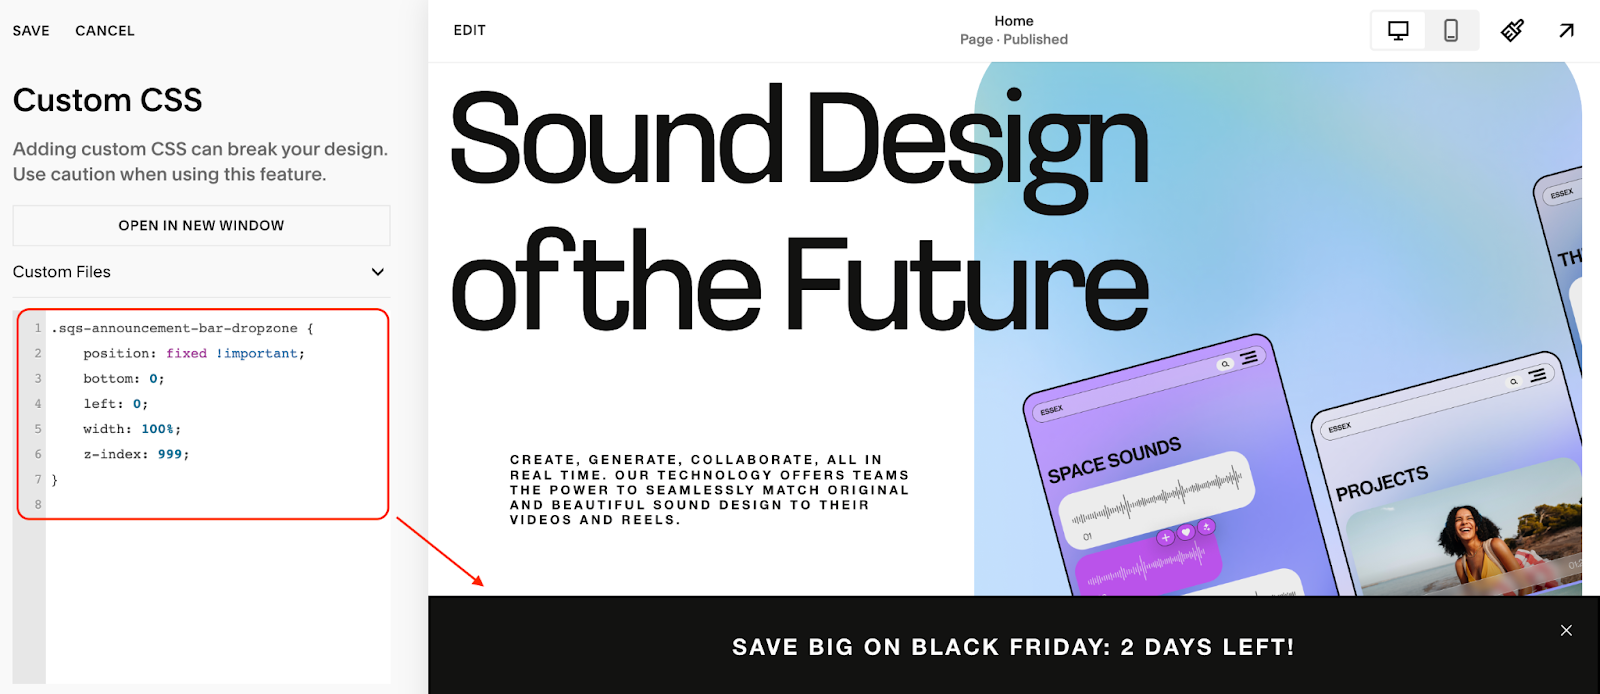
If you want your announcement bar to stay visible at the bottom of the page no matter how far a user scrolls, you can easily make it stick to the bottom.
Simply add these lines to Custom CSS:
.sqs-announcement-bar-dropzone {
position: fixed !important;
bottom: 0;
left: 0;
width: 100%;
z-index: 999;
}
Wrapping Up
The Squarespace announcement bar is more than just a random feature. With a little creativity and customization, it becomes an effective tool for engaging your audience and sharing important updates.
We hope that the steps in this guide will help you easily set up and style your announcement bar to get outstanding results.

